Tuesday 29 October 2019

Diwali Animation Created Using Html and CSS


  Animation Html Code :


<!DOCTYPE html>
<html>
<head>
<style>
@keyframes Animation1
{
 0%{left:10px; top:10px;}
 25%{left:380px; top:10px;}
 50%{left:330px; top:230px;}
 75%{left:10px; top:230px;}
 100%{left:10px; top:10px;}
}
@keyframes Animation2
{
 0%{left:800px; top:30px;}
 25%{left:1000px; top:30px;}
 50%{left:1000px; top:230px;}
 75%{left:800px; top:230px;}
 100%{left:800px; top:30px;}
}
#img1
{
 width:70px;
 height:70px;
 position:relative;
 left:300px;
 top:20px;
 animation-name:Animation1;
 animation-duration:10s;
 animation-delay:2s;
 animation-iteration-count: 5;
}
#img2
{
 width:70px;
 height:70px;
 position:relative;
 left:800px;
 top:20px;
 animation-name:Animation2;
 animation-duration:10s;
 animation-delay:2s;
 animation-iteration-count: 5;
}
#div1

 border:0px solid blue;
 border-radius:10px;
 position:relative;
 left:460px;
 bottom:50px;
 height:400px;
 width:400px;
}
h1
{
  color:lightblue;
  font-family:tahoma;
}
</style>
</head>
<body bgcolor="black">

</hr>

<img id="img1" src="diwali.png" width="100" height="100"/>

<img id="img2" src="diwali.png" width="100" height="100"/>
<div id="div1">
<img src="happy diwali2.gif" width="400" height="400"/>
</div>
<br><br>
<h1><marquee> this Animation created by sreenu</marquee></h1>
</body>
</html>


Saturday 14 September 2019

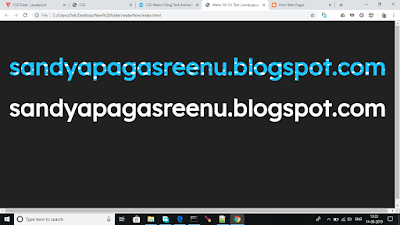
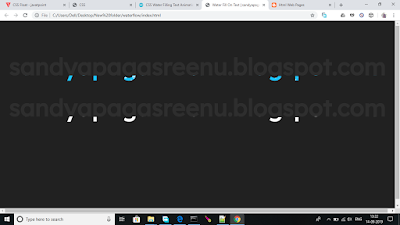
water flow on text animation using html and css

water flow on text animation using html and css  source code view below


  in this animation we have to create two files  this are

  1.index.html
  2.style.css

Index.html:
 = = = = =
<html lang="en" >
<head>
  <meta charset="UTF-8">
  <title>Water Fill On Text | sandyapagasreenu.blogspot.com</title>
  <link rel="stylesheet" href="style.css">
  <script src="https://cdnjs.cloudflare.com/ajax/libs/prefixfree/1.0.7/prefixfree.min.js"></script>
  <link href="https://fonts.googleapis.com/css?family=Lexend+Deca&display=swap" rel="stylesheet">

</head>
<body>
<div class="loading wave">
sandyapagasreenu.blogspot.com
</div>
<div class="loading2 wave2">
  sandyapagasreenu.blogspot.com
</div>
</body>
</html>

style.css
= = = =  =
body {
  background: #212121;
  width: 100%;
  height: 100%;
}
.loading, .loading2 {
  text-transform: lowercase;
  font-family: 'Lexend Deca', sans-serif;
  font-weight: bold;
  font-size: 60pt;
  text-align: center;
  height: 120px;
  line-height: 110px;
  vertical-align: bottom;
  position: absolute;
  left: 0;
  right: 0;
  top: 100px;
  bottom: 0;
  display: block;
}
.loading2 {
  top: 240px;
}
.wave {
  background-image: url("https://webdevtrick.com/wp-content/uploads/water-wave-blue.png");
  -moz-background-clip: text;
  -o-background-clip: text;
  -webkit-background-clip: text;
  background-clip: text;
  color: transparent;
  text-shadow: 0px 0px rgba(255, 255, 255, 0.06);
  animation: wave-animation 1s infinite linear, loading-animation 10s infinite linear alternate;
  background-size: 200px 100px;
  background-repeat: repeat-x;
  opacity: 1;
}
.wave2 {
  background-image: url("https://webdevtrick.com/wp-content/uploads/water-wave.png");
  -moz-background-clip: text;
  -o-background-clip: text;
  -webkit-background-clip: text;
  background-clip: text;
  color: transparent;
  text-shadow: 0px 0px rgba(255, 255, 255, 0.06);
  animation: wave-animation 1s infinite linear, loading-animation 10s infinite linear alternate;
  background-size: 200px 100px;
  background-repeat: repeat-x;
  opacity: 1;
}

@keyframes wave-animation {
  0% {
    background-position: 0 bottom;
  }
  100% {
    background-position: 200px bottom;
  }
}
@keyframes loading-animation {
  0% {
    background-size: 200px 0px;
  }
  100% {
    background-size: 200px 200px;
  }
}
@media (max-width: 765px) {
  .loading, .loading2 {
    font-size: 50pt;
  }
}

Saturday 3 August 2019

Tutorial Home Page Design Using JavaScript Gradient Navigation Html and Css


Tutorial Home Page Design Using JavaScript Gradient Navigation Html and CSS :
in this We Have create 3 files there are
1.index.html
2.style.css
3.function.js

in the  Navigation part  We have to add Text or Images.


Index.html:
= = = = = =  =
<html lang="en" >
<head>
  <meta charset="UTF-8">
  <title>JavaScript Gradient Navigation</title>
  <link href="https://fonts.googleapis.com/css?family=Anton&display=swap" rel="stylesheet">
  <link rel='stylesheet' href='https://cdnjs.cloudflare.com/ajax/libs/font-awesome/5.9.0/css/all.min.css'>
<link rel="stylesheet" href="style.css">
</head>
<body bgcolor="black">
 <center><h1>Choose Gradient Direction</h1></center>
<div class="content">
  <div class="wrap">
    <div class="inner-sec">
      <div class="btns">
        <button class="btn btn top  active" type="button"  data-dir="top"><i class="fas fa-long-arrow-alt-right"></i></button>
        <button class="btn btn left" type="button" data-dir="left"><i class="fas fa-long-arrow-alt-right"></i></button>
        <button class="btn  btn bottom" type="button" data-dir="bottom"><i class="fas fa-long-arrow-alt-right"></i></button>
        <button class="btn  btn" type="button"  data-dir="right"><i class="fas fa-long-arrow-alt-right"></i></button>
        <button class="btn  btn top-left" type="button" data-dir="top left"><i class="fas fa-long-arrow-alt-right"></i></button>
        <button class="btn  btn top-right" type="button"  data-dir="top right"><i class="fas fa-long-arrow-alt-right"></i></button>
        <button class="btn  btn bottom-left" type="button"  data-dir="bottom left"><i class="fas fa-long-arrow-alt-right"></i></button>
        <button class="btn  btn bottom-right" type="button"  data-dir="bottom right"><i class="fas fa-long-arrow-alt-right"></i></button>
      </div>
    </div>
  </div>
 <div class="wrap">
    <div class="inner-sec area" data-gradient="#FF3434, #FFC41E 40%, #009EE3 80%" data-gradient-direction="top">
      <div class="items">
    <a href="https://www.javatpoint.com/html-tutorial">
        <img src="img1.png" height=120 width=150/>
</a>
      </div>
      <div class="items">
  <a href="https://www.javatpoint.com/css-tutorial">
       <img src="img2.png" height=120 width=150/>
   </a>
      </div>
      <div class="items">
     <a href="https://www.javatpoint.com/javascript-tutorial">
        <img src="img3.jpg" height=120 width=150/>
</a>
      </div>
      <div class="items">
  <a href="https://www.javatpoint.com/java-tutorial">
        <img src="img4.jpg" height=120 width=150/>
</a>
      </div>
      <div class="items">
     <a href="https://www.javatpoint.com/net-framework">
        <img src="img12.jpg" height=120 width=150/>
</a>
      </div>
      <div class="items">
     <a href="https://www.javatpoint.com/angularjs-tutorial">
         <img src="img6.png" height=120 width=150/>
</a>
      </div>
      <div class="items">
  <a href="https://www.javatpoint.com/php-tutorial">
         <img src="img7.png" height=120 width=150/>
</a>
      </div>
      <div class="items">
      <a href="https://www.javatpoint.com/jquery-tutorial">
         <img src="img8.jpg" height=120 width=150/>
</a>
      </div>
      <div class="items">
    <a href="https://www.javatpoint.com/jsp-tutorial">
       <img src="img9.jpg" height=120 width=150/>
   </a>
      </div>
 <div class="items">
      <a href="https://www.javatpoint.com/nodejs-tutorial">
         <img src="img10.png" height=120 width=150/>
</a>
      </div>
      <div class="items">
      <a href="https://www.javatpoint.com/oracle-tutorial">
         <img src="img11.png" height=120 width=150/>
</a>
      </div>
      <div class="items">
     <a href="https://www.javatpoint.com/c-programming-language-tutorial">
         <img src="img12.png" height=120 width=150/>
</a>
      </div>

    </div>
  </div>
</div>
  <script  src="function.js"></script>
</body>

</html>

Style.Css :
 = = = = =  =
body {
  font-family: 'Anton', sans-serif;
  color: #212121;
  letter-spacing: 2px;
}
body a {
  color: inherit;
  text-decoration: none;
}
h1
{
color:white;
}
.btns {
  display: flex;
  justify-content: center;
}
.btn {
  transition-property: all;
  transition-duration: 0.2s;
  transition-timing-function: linear;
  transition-delay: 0s;
  padding: 20px 20px;
  margin-right: 10px;
  background-color: #fff;
  border: 2px solid #212121;
  border-radius: 50%;
  cursor: pointer;
  outline: none;
}
.btn:last-child {
  margin-right: 0;
}
.btn:hover, .btn.active {
  color: #fff;
  background-color: red;
}
.btn i {
  font-size: 1rem;
}
.content {
  max-width: 700px;
  margin: auto;
}
.wrap {
  margin-bottom: 50px;
}
h2 {
  font-weight: 500;
  text-align: center;
}
.top i {
  -webkit-transform: rotate(-90deg);
          transform: rotate(-90deg);
}
.bottom i {
  -webkit-transform: rotate(90deg);
          transform: rotate(90deg);
}
.left i {
  -webkit-transform: rotate(180deg);
          transform: rotate(180deg);
}
.top-left i {
  -webkit-transform: rotate(-135deg);
          transform: rotate(-135deg);
}
.top-right i {
  -webkit-transform: rotate(-45deg);
          transform: rotate(-45deg);
}
.bottom-left i {
  -webkit-transform: rotate(135deg);
          transform: rotate(135deg);
}
.bottom-right i {
  -webkit-transform: rotate(45deg);
          transform: rotate(45deg);
}
.area {
  display: grid;
  grid-gap: 20px;
  grid-template-columns: repeat(auto-fit, minmax(220px, 1fr));
}
.items {
  transition-property: all;
  transition-duration: 0.2s;
  transition-timing-function: linear;
  transition-delay: 0s;
  padding: 40px 20px;
  height: 100px;
  line-height: 100px;
  font-size: 2rem;
  text-align: center;
  color: #fff;
  border: 2px solid #212121;
  border-radius: 5px;
  cursor: pointer;
}
.items:hover {
  transform: scale(1.5);
  z-index: 9999;

}


Function.js:
 = = = = = =  =

const Area = document.querySelector('.area');
const Items = document.querySelectorAll('.items');

const gradValue = () => {
  return Area.dataset.gradient;
};
const gradDir = () => {
  return Area.dataset.gradientDirection;
};
const buildGrad = (value, direction) => {
  return `to ${direction}, ${value}`;
};

const gradSize = () => {

  let firstItemPosX = Items[0].getBoundingClientRect().left;
  let cols = 1;

  for (let i = 1; i < Items.length; i++) {
    if (Items[i].getBoundingClientRect().left > firstItemPosX) {
      cols++;
    } else {
      break;
    }
  }
  let itemPosY = Items[0].getBoundingClientRect().top;
  let rows = 1;
  for (let i = 1; i < Items.length; i++) {

    if (Items[i].getBoundingClientRect().top > itemPosY) {
      rows++;
      itemPosY = Items[i].getBoundingClientRect().top;
    }
  }
  const itemWidth = Items[0].offsetWidth;
  const itemHeight = Items[0].offsetHeight;
  let gradSizeX = itemWidth * cols;
  let gradSizeY = itemHeight * rows;
  return [gradSizeX, gradSizeY, cols, rows];
};

const colRow = () => {

  let row = 1;
  let col = 1;

  let xItemPos = Items[0].getBoundingClientRect().left;

  for (let i = 0; i < Items.length; i++) {

    if (Items[i].getBoundingClientRect().left > xItemPos) {
      col++;
    } else {
      col = 1;
    }

    Items[i].dataset.col = col;
  }

  let yItemPos = Items[0].getBoundingClientRect().top;

  for (let i = 0; i < Items.length; i++) {

    if (Items[i].getBoundingClientRect().top > yItemPos) {
      row++;
      yItemPos = Items[i].getBoundingClientRect().top;
    }
    Items[i].dataset.row = row;

  }
};

const setGrad = elem => {

  const bgImg = `linear-gradient(${buildGrad(gradValue(), gradDir())})`;

  elem.style.backgroundImage = bgImg;

  const bgSizeX = `${gradSize()[0]}`;
  const bgSizeY = `${gradSize()[1] + 5}`;

  elem.style.backgroundSize = `${bgSizeX}px ${bgSizeY}px`;

  const bgPosX = bgSizeX * (elem.dataset.col - 1) / gradSize()[2];
  const bgPosY = bgSizeY * (elem.dataset.row - 1) / gradSize()[3];

  elem.style.backgroundPosition = `${-bgPosX}px ${-bgPosY}px`;

};

const setGradientBg = () => {
  Items.forEach(elem => {

    colRow();

    setGrad(elem);

  });
};

setGradientBg();

window.addEventListener('resize', setGradientBg);

const dirBtns = document.querySelectorAll('.btn');

dirBtns.forEach(elem => {

  elem.addEventListener('click', () => {
    const dir = elem.dataset.dir;
    Area.dataset.gradientDirection = dir;
    setGradientBg();
    dirBtns.forEach(elem => elem.classList.remove('active'));
    elem.classList.add('active');

  });


});


Tuesday 9 July 2019

arithmatic operations page using html css and javascript


<html>
<head> </head>
<body bgcolor=cyan text=orange>
<center>
<h3>Javascript Programming</h3>
<hr/>
<table>
<tr>
<th>First Number:</th>
<td><input type="text" id="t1" value=" "/></td></tr>
<tr><th>Second Number:</th>
<td><input type="text" id="t2" value=" "/><td></tr>
<tr><td><input type="button" onclick="f1()" value="sum"/>
<input type="button" onclick="f2()" value="sub"/>
<input type="button" onclick="f3()" value="mul"/>
<input type="button" onclick="f4()" value="div"/>
</td></tr>
<tr><td><p id="p1"> </p>
<p id="p2"> </p>
<p id="p3"> </p>
<p id="p4"> </p></td></tr>
<script>
function f1()
{
var obj1=document.getElementById("t1");
var obj2=document.getElementById("t2");
var obj3=document.getElementById("p1");
var x=parseInt(obj1.value);
var y=parseInt(obj2.value);
var z=x+y;
obj3.innerText="sum Results:"+z;
}
function f2()
{
var obj1=document.getElementById("t1");
var obj2=document.getElementById("t2");
var obj3=document.getElementById("p2");
var x=parseInt(obj1.value);
var y=parseInt(obj2.value);
var z=x-y;
obj3.innerText="sub Results:"+z;
}
function f3()
{
var obj1=document.getElementById("t1");
var obj2=document.getElementById("t2");
var obj3=document.getElementById("p3");
var x=parseInt(obj1.value);
var y=parseInt(obj2.value);
var z=x*y;
obj3.innerText="mul Results:"+z;
}
function f4()
{
var obj1=document.getElementById("t1");
var obj2=document.getElementById("t2");
var obj3=document.getElementById("p4");
var x=parseInt(obj1.value);
var y=parseInt(obj2.value);
var z=x/y;
obj3.innerText="div Results:"+z;
}

</script>
</table>
</center>
</body>
</html>


Saturday 6 July 2019

Horizontal paragraphs information using html and CSS3


<html>
<head>
<style>
#div1::first-letter
{
 color:green;
 font-size:40px;
}

#div1
{
  background-color:lightyellow;
  border:2px solid green;
  padding:5px;
  text-align:justify;
  column-width:150px;
  column-rule:5px double green;
 }
</style>
</head>
<body>
 <h1 align="center">CSS3</h1>
 <hr></hr>
 <div id="div1">
Hyderabad Sunrisers  captain Mr.Scott credited his bowlers after his side 
registered a 
massive 10-wicket win over Gujarat Lions on Thursday night. Opting to bowl,
 Bhuvneshwar Kumar's four for 29 helped SRH restrict Gujarat Lions to 135 for eight on a two-paced track.

Boosted by his team's bowling performance, 
Shikhar Dhawan too roared back to form to hit an unbeaten 53 as SRH posted their second successive victory in the Indian Premier League 2016. Skipper Warner too continued with his rich vein of form to hit 74 not out off just 48 balls.
<br><br>
"I have to give credit to the bowlers. Gives us a great opportunity to play the way we want to play with the bowlers restricting the opposition. Our bowlers were fantastic. Bhuvi and Fizzy, his change of pace is very different. I faced him in Bangalore and he tried to knock my block off. It's a great art to change the pace as he does.
<br><br>
"Proud of the way the bowlers are bowling and if we keep chasing totals like this, we'll go a long way in the tournament," Warner said.
<br><br>
Man of the Match Bhuvneshwar Kumar was elated with his performance and said Aaron Finch's wicket was a big boost.<br>
<br>
"It was a big boost. He was the one who scored runs for them, won all three matches for them. Wanted to get him early on. Heavily dependent on top three, they are. If we could get them out, the team wouldn't score too many," Bhuvneshwar said. 

Sunrisers Hyderabad captain David Warner credited his bowlers after his side registered a massive 10-wicket win over Gujarat Lions on Thursday night. Opting to bowl, Bhuvneshwar Kumar's four for 29 helped SRH restrict Gujarat Lions to 135 for eight on a two-paced track.

Boosted by his team's bowling performance, Shikhar Dhawan too roared back to form to hit an unbeaten 53 as SRH posted their second successive victory in the Indian Premier League 2016. Skipper Warner too continued with his rich vein of form to hit 74 not out off just 48 balls.
<br><br>
"I have to give credit to the bowlers. Gives us a great opportunity to play the way we want to play with the bowlers restricting the opposition. Our bowlers were fantastic. Bhuvi and Fizzy, his change of pace is very different. I faced him in Bangalore and he tried to knock my block off. It's a great art to change the pace as he does.
<br><br>
"Proud of the way the bowlers are bowling and if we keep chasing totals like this, we'll go a long way in the tournament," Warner said.
<br><br>
Man of the Match Bhuvneshwar Kumar was elated with his performance and said Aaron Finch's wicket was a big boost.<br>
<br>
"It was a big boost. He was the one who scored runs for them, won all three matches for them. Wanted to get him early on. Heavily dependent on top three, they are. If we could get them out, the team wouldn't score too many," Bhuvneshwar said. 
 </div>

</body>
</html>

Wednesday 3 July 2019

Student information form using html and css


<html>
<head>
<style>

h1
  { 
    color:green;
text-decoration:yellow;
  }
</style>
</head>
<body>
<table>
<center>
<h1>Student Form </h1>
<hr/>
<form id="form1" autocomplete="off" action="Register.java" method="GET">
Student Name:
<input type="text" name="t1" autofocus required />
<br/> <br/>
Student Age:
<input type="number" min="20" max="100" name="t2"/>
<br/> <br/>
Email ID:
<input type="email" name="t3"/>
<br/> <br/>
Pin code:
<input type="text" name="t4" pattern="\d{6}"/>
<br/> <br/>
Join Date:
<input type="date" name="t5" />
<br/> <br/>
are you agree terms and conditions?
<input form="form1" type="checkbox" name="ck1" value="yes" /><br/><br/>
<input type="submit" value="Register"/>
</form><br/>
</center>
</body>
</html>


Tuesday 2 July 2019

text styles in css3 using a web pages


<!DOCTYPE html>
<html>
<head>
<style>
p
{
 border:2px solid blue;
 padding:4px;
}
h1
{
 color:blue;
 fozt-size:50px;
 text-align:center;
 text-shadow:0px 0px 10px red;
}
h3
{
 border:2px solid green;
 text-align:center;
}

</style>
</head>
<body>
<h1>Text Styles of CSS3</h1>
<hr/>
<p style="text-align:justify;word-spacing:10px;">
this we page is developed by using css3 text styles</p>

<h3 style="letter-spacing:10px;">Aurora's Technology & Management Academy</h3>

<h3 style="text-transform:uppercase;">Aurora's Technology & Management Academy</h3>
<h3 style="text-transform:lowercase;">Aurora's Technology & Management Academy</h3>
<h3 style="text-transform:capitalize;">Aurora's Technology & Management Academy</h3>
<h3 style="text-decoration:underline;">Aurora's Technology & Management Academy</h3>
<h3 style="padding-top:10px;text-decoration:overline;">Aurora's Technology & Management Academy</h3>
<h3 style="text-decoration:line-through;">Aurora's Technology & Management Academy</h3>

</body>
</html>

Monday 1 July 2019

online product details page using html and css


<!DOCTYPE html>
<html> 
<head>
<style>
figure
{
  border:1px solid blue;
  width:250px;
  text-align:center;
  padding bottom:20px;
  border-radias:5px;
}
</style>
</head>
<body>
<h1>HTML5 semantic Tags </h1>
<hr> </hr>
<figure>
<img border="0" src="iphone.jpg" width="200"/>
<figcaption>product name:iphone 7s </figcaption>
</figure>
<br/> <br/>
<details>
<summary>show/hide product features</summary>

<ul>
<li>1715 mAH li-ion Battery</li>
<li>2GB RAM|16GB ROM </li>
<li>icloud</li>
<li>16MP primary camera|5MP front</li>
<li>5.7 inch retina Display</li>
<li>photo and video geotagging</li>
</ul>
</details>
</body>
</html>


</html>

Saturday 15 June 2019

Tutorail home page designing using html and css


   Tutorail home page designing using html and css

<html>
<head>
<style>
.list
{
 font-size:20;
 font-family:tahoma;
}
h1
{
 color:green;
 text-align:center;
 font-size:50;
}
footer
{
  background-color:Darkred;
  color:white;
  text-align:justify;
  height:30px;
  padding-top:10px;
  border-radius:10px;
}
</style>
</head>
<body bgcolor=pink>
<div class="main">
<div>
<h1><u>Web Technologies Tutorials</u></h1>

</div>
<div class="list"> 
<ul>
<li><a href="https://www.javatpoint.com">Home</a></li>
<li><a href="java.html" class="selected">Java</a></li>
<li><a href="c.html">C</a></li>
<li><a href="c++.html">C++</a></li>
<li><a href="c-sharp-tutorial">C#</a></li>
<li><a href="servlet.html">Servlet</a></li>
<li><a href="jsp.html">JSP</a></li>
<li><a href="ejb-tutorial">EJB</a></li>
<li><a href="struts-2-tutorial">Struts2</a></li>
<li><a href="mail.html">Mail</a></li>
<li><a href="hibernate.html">Hibernate</a></li>
<li><a href="spring.html">Spring</a></li>
<li><a href="android.html">Android</a></li>
<li><a href="design-patterns-in-java">Design Pattern</a></li>
<li><a href="examaccess">Quiz</a></li>
<li><a href="free-java-projects">Projects</a></li>
<li><a href="corejava-interview-questions">Interview Q</a>
<li><a href="comment.html">Comment</a>
<li><a href="forum.html">Forum</a>
<li><a href="training.html">Training</a>
</li>
</ul>
</div>
</div>
<footer><b>&copy; Copy Right 2019 Sathya Technologies Ameerpet, HYD.<b></footer>
</body>
</html>

Friday 14 June 2019

Bank money Transfer form using html


 <html>
<title><signin></title>
<center>
<h1> Bank Money Transfer</h1>
<form method="Get" action="Check">
<FONT SIZE="20" FACE="courier" COLOR=blue>
<body bgcolor="#E7E7EF"><br>
<table>
<tr><td><h3>Account No</h3></td><td ><input type=text name="user"></td></tr>
<tr><td><h3>IFSC Code</h3></td><td ><input type=text name="user"></td></tr>
<tr><td><h3>Account Holder name</h3></td><td ><input type=text name="user"></td></tr>
<tr><td><h3>Amount</h3></td><td><input type=password name="pass"></td></tr>
<tr><td><h3>Re-enter Account NO</h3></td><td ><input type=text name="user"></td></tr>
<tr><th COLSPAN="2"><input type=submit value="SUBMIT" name="SUBMIT"></tr>
</table>
</center>
</body>
</html>


Friday 7 June 2019

Simple Calculator using Html Css and JavaScript

  Simple Calculator using Html Css and JavaScript 


<html>
<head>
<style>
.button
{  
  width:50;
  height:50;
  font-size:25;
  margin:2;
  cursor:pointer;
  background:#607d8b;
  border:none;
  color:white;
}
.textview
{
  width:225;
  margin:5;
  font-size:25;
  padding:5;
  border:none;
  color:#607d8b;
}
.main
{
  position:absolute;
  top:50%;
  left:50%;
  transform:translateX(-50%)translateY(-50%)
}
.bg

  background:linear-gradient(to right,#e91e63,#3151b5);
  height:100%;

}
h1
{
 position:absolute;
 top:10%;
 left:42%;
 font-size:30;
}
</style>
<script>

function insert(num)
{
  document.form.textview.value=document.form.textview.value+num 
   
}
function equal()
{
  var exp=document.form.textview.value;
  if(exp)
  {
    document.form.textview.value=eval(exp);
  }
}
function clean()
{
  document.form.textview.value="";
}
function back()

 var exp=document.form.textview.value;
  document.form.textview.value=exp.subString(0,exp.lenth-1);

}
</script>
</head>
<body> 
     <h1> Simple Calculator</h1>
       <div class="bg"></div>
      <div class="main">
  <form name="form">
  <input class="textview" name=textview>
  </form>
  <table>
  <tr>
        <td> <input class="button"  type="button"  value=C onclick="clean()"></td>
<td> <input class="button"  type="button" value=< onclick="back()"></td>
<td> <input class="button"  type="button" value=/ onclick=insert("/")></td>
<td> <input class="button"  type="button" value=* onclick=insert("*")></td>
  </tr>
   <tr>
        <td> <input class="button"  type="button" value=7 onclick=insert(7)></td>
<td> <input class="button"  type="button" value=8 onclick=insert(8)></td>
<td> <input class="button"  type="button" value=9 onclick=insert(9)></td>
<td> <input class="button"  type="button" value="=" onclick="equal()"></td>
  </tr>
   <tr>
        <td> <input class="button"  type="button" value=4 onclick=insert(4)></td>
<td> <input class="button"  type="button" value=5 onclick=insert(5)></td>
<td> <input class="button"  type="button" value=6 onclick=insert(6)></td>
<td> <input class="button"  type="button" value=- onclick=insert("-")></td>
  </tr>
   <tr>
        <td> <input class="button"  type="button" value=1 onclick=insert(1)></td>
<td> <input class="button"  type="button" value=2 onclick=insert(2)></td>
<td> <input class="button"  type="button" value=3 onclick=insert(3)></td>
<td rowspan=5> <input class="button" style="height:106"  type="button" value=+ onclick=insert("+")></td>
  </tr>
   <tr>
        <td colspan=2> <input class="button" style="width:106"  type="button" value=0 onclick=insert(0)></td>
<td> <input class="button"  type="button" value=. onclick=insert(.)></td>
   </tr>
  </table>
</body>
</html>

Friday 26 April 2019

Online Product Selling Page Desing Using Html and Css


<!--Example for formatting tags-->
<html>
<head> </head>
<body bgcolor="lightyellow">
<h1 align="center">
        <u>Formatting Tags in HTML</u>
</h1>
<hr/>
<div style="text-align:center;">
<img src="dell.jpg" border="2" width="300" />
<br/>

<span style="color:blue;">
<strong>Dell Laptop_D5600</strong>
</span>
<br/>

<span style="color:red;">
actual price:INR <del>35500.00</del>
</span>
<br>

<span style="color:green;"
<em>Discount price:INR 30000.00</em>
</span>
<br/>

<mark style="background-color:aqua;">
note:this account price is available only today </mark>
<br/><br/><br/>


</div>
<br/>
<div style="text-align:center;">
<img src="iphone.jpg" border="2" width="250" />
<br/>

<span style="color:blue;">
<strong>IPhone_6</strong>
</span>
<br/>

<span style="color:red;">
actual price:INR <del>45500.00</del>
</span>
<br>

<span style="color:green;"
<em>Discount price:INR 40000.00</em>
</span>
<br/>

<mark style="background-color:yellow;">
note:this account price is available only today </mark>
<br/>

</div>

</body>
</html>


Formatting Tags in HTML


Formatting Tags in HTML:
= = = = = = = = = = = = = =
-> formatting tags are used formatting text that we prepared in html in html document.
-> these tags helps us to present the text with different formats like bold ,italic ,highlighing etc...
   
    1) bold---<strong>
    2) italic-----<em>
    3) underline----<u>
    4) delect text------<del>
    5) text marking----<mark>

<!---example for formatting tags-->
<html>
<head> </head>
<body bgcolor="lightyellow">
<h1 align="center">
        <u>Formatting Tags in HTML</u>
</h1>
<hr/>
<div style="text-align:center;">
<img src="dell.jpg" border="2" width="300" />
<br/>

<span style="color:blue;">
<strong>Dell Laptop_D5600</strong>
</span>
<br/>

<span style="color:red;">
actual price:INR <del>35500.00</del>
</span>
<br>

<span style="color:green;"
<em>Discount price:INR 30000.00</em>
</span>
<br/>

<mark style="background-color:aqua;">
note:this account price is available only today </mark>
<br/><br/><br/>


</div>
<br/>
<div style="text-align:center;">
<img src="iphone.jpg" border="2" width="250" />
<br/>

<span style="color:blue;">
<strong>IPhone_6</strong>
</span>
<br/>

<span style="color:red;">
actual price:INR <del>45500.00</del>
</span>
<br>

<span style="color:green;"
<em>Discount price:INR 40000.00</em>
</span>
<br/>

<mark style="background-color:yellow;">
note:this account price is available only today </mark>
<br/>

</div>

</body>
</html>
   

Wednesday 24 April 2019

Registation Form with Social Link Using Html and Css


Index.html:
 = = = == = =
<html>
<head>
<title>RegistationForm</title>
<link rel="stylesheet" type="text/css" href="style.css">
</head>
<body>
    <div id="login-box">
   <div class="left-box">
   <h1> RegistationForm</h1>
   <input id="if" type="text" name="fname" placeholder="Firstname"/>
   <input id="if" type="text" name="lname" placeholder="Lastname"/>
   <input id="if" type="text" name="uname" placeholder="Username"/>
   <input id="if" type="password" name="pword" placeholder="Password"/>
   <input id="s" type="submit" name="reg" value="Registar"/>
      </div>
  <div class="right-box">
   <span class="signinwith">sig in with<br/>Social Network</span>
   <button class="social facebook">log in with Facebook</button>
   <button class="social twitter">log in with twitter</button>
<button class="social google">log in with Google+</button>
  </div>
     <div class="or">OR</div>
   </div>   

</body>
</html>

Style.css :
= = = = = =

 body
 {
   margin:0;
   padding:0;
   background:#efefef;
   font-size:16px;
   color:#777;
   font-family:sans-serif;
   font-weight:300;

 }
 #login-box
 {
position:relative;
margin:5% auto;
height:400px;
width:600px;
background:#fff;
box-shadow: 0 2px 4px rgba(0,0,0,0,6);
 
 }
 .left-box
 {
position:absolute;
top: 0;
left: 0;
box-sizing:border-box;
padding:40px;
width:300px;
height:400px;  
 }
 h1
 {
margin:0 0 20px 0;
font-weight:300;
font-size:28px;
 }

 #if
{
display:block;
    box-sizing:border-box;
    margin-bottom:20px;
    padding:4px;
    width:220px;
    height:32px;
    border:none;
    outline:none;
    border-bottom:1px solid #aaa;
    font-family:sans-serif;
    font-weight:400;
    font-size:15px;
    transition:0.2s ease;


#s
{
margin-bottom:28px;
width:120px;
height:32px;
background:#f44336;
border:none;
border-radius:2px;
color:#fff;
font-family:sans-serif;
font-weight:500;
text-transform:uppercase;
transition:0.2s ease;
cursor:pointer;

}
#s:hover,
#s:focus

 background:#ff5722;
 transition:0.2s ease;
}

 .right-box
 {
position:absolute;
top: 0;
right: 0;
box-sizing:border-box;
padding:40px;
width:300px;
height:400px;
     background-image:url
     background-size:cover;
     background-position:center;  
 }
 .or
 {
position:absolute;
top:180px;
left:265px;
width:40px;
height:40px;
background:#efefef;
border-radius:50%;
box-shadow:0 2px 4px rgba(0,0,0,0,6);
line-height:40px;
text-align:center;
 
 }
 .right-box .signinwith
 {
display:block;
margin-bottom:48px;
font-size:28px;
color:#efff;
text-align:center;
text-shadow:0 2px 4px rgba(0,0,0,0,6);

 }
 button.social
 {
margin-bottom:28px;
width:220px;
height:36px;
border:none;
border-radius:2px;
color:#fff;
font-family:sans-serif;
font-weight:500;
transition:0.2s ease;
cursor:pointer;

 }
 .facebook
 {
    background:#32508e;
 }

 .twitter
 {
    background:#55acee;
 }
 .google
 {
    background:#dd4b39;
 }


Friday 19 April 2019

HTML Hyper Links Re-Directing One Website to Another Website


<!--create a web page to demonstrate hyperlinks in HTML-->
<html>
<head> 
<link rel="shortcut icon" href="google1.png"/>
</head>
<body>
<h1 id="top" >Welcome to HTML</h1>
<hr\>


<img src="contact.png"/ width="20" height="15"/> 
<a href="contact.html">contact us</a> <br/>

<img src="about.png"/ width="20" height="15"/> 
<a href="about.html">about us</a> <br/>
<hr\>

<img src="facebook.png"/ width="20" height="15"/> 
<a href="http://www.facebook.com">facebook</a> <br/>

<img src="twitter.png"/ width="20" height="15"/> 
<a href="http://www.Twitter.com">Twitter</a> <br/>
<hr\>

<img src="html5.png"/ width="20" height="15"/> 
<a href="#s1">HTML5</a><br/>

<img src="jquery.png"/ width="20" height="15"/> 
<a href="#s2">JQuery</a>
 <br/><br/><br/><br/><br/><br/><br/><br/><br/><br/><br/><br/><br/><br/><br/><br/><br/><br/><br/><br/><br/><br/>
<br/><br/><br/><br/><br/><br/><br/><br/><br/><br/><br/><br/><br/><br/><br/><br/><br/><br/><br/><br/>
<br/><br/><br/><br/><br/><br/><br/>

<h3 id="s1">HTML5</h3>
<p>HTML5 is a latest version that provides new tags in order to developing web pages.
HTML5 is a latest version that provides new tags in order to developing web pages.
HTML5 is a latest version that provides new tags in order to developing web pages.</p>

<a href="#top">back to top</a>

<br/><br/><br/><br/><br/><br/><br/><br/><br/><br/><br/><br/><br/><br/><br/><br/>

<h3 id="s2">JQuery</h3>
<p>jquery is javascript based library that makes client side programming easy.
   jquery is javascript based library that makes client side programming easy.
   jquery is javascript based library that makes client side programming easy.
   jquery is javascript based library that makes client side programming easy.</p>
   
   <a href="#top">back to top</a>
   
</body>
</html>

Hyper Links in HTML


Hyper Links in Html:
= = = = = =  = = = = = =
-> hyper links in html document are created by using anchor tag (eg: <a> </a>)
-> we can navigate from one page to another page (same site)
-> we implement navigation with different options
      1.navigation to another page(same site)
      2.navigate to external web sites (different site)
      3.navigate to section the same page.
usage:
= = = = 
       <a href=url>text</a>
attribute: href stands for hyper link reference

Types of URL:
= = = = = = = =
-> url that we are using in hyper links are divided two types
      1.Relative URLs
      2.Absolute URLs

-> Relelative URLs refer same website it does not required website name in URLs.
     eg: <a href="contact.html">Contact us</a>

-> Absolute URLs refers different websites it includes Compelete Web site same with protocal. 
    eg: <a href="http://www.facebook.com">facebook</a>

eg:
 <!-- create web page to demon strate on hyperlinks in HTML-->
  <html>
<head> 
<link rel="shortcut icon" href="google1.png"/>
</head>
<body>
<h1 id="top" >Welcome to HTML</h1>
<hr\>


<img src="contact.png"/ width="20" height="15"/> 
<a href="contact.html">contact us</a> <br/>

<img src="about.png"/ width="20" height="15"/> 
<a href="about.html">about us</a> <br/>
<hr\>

<img src="facebook.png"/ width="20" height="15"/> 
<a href="http://www.facebook.com">facebook</a> <br/>

<img src="twitter.png"/ width="20" height="15"/> 
<a href="http://www.Twitter.com">Twitter</a> <br/>
<hr\>

<img src="html5.png"/ width="20" height="15"/> 
<a href="#s1">HTML5</a><br/>

<img src="jquery.png"/ width="20" height="15"/> 
<a href="#s2">JQuery</a>
 <br/><br/><br/><br/><br/><br/><br/><br/><br/><br/><br/><br/><br/><br/><br/><br/><br/><br/><br/><br/><br/><br/>
<br/><br/><br/><br/><br/><br/><br/><br/><br/><br/><br/><br/><br/><br/><br/><br/><br/><br/><br/><br/>
<br/><br/><br/><br/><br/><br/><br/>

<h3 id="s1">HTML5</h3>
<p>HTML5 is a latest version that provides new tags in order to developing web pages.
HTML5 is a latest version that provides new tags in order to developing web pages.
HTML5 is a latest version that provides new tags in order to developing web pages.</p>

<a href="#top">back to top</a>

<br/><br/><br/><br/><br/><br/><br/><br/><br/><br/><br/><br/><br/><br/><br/><br/>

<h3 id="s2">JQuery</h3>
<p>jquery is javascript based library that makes client side programming easy.
   jquery is javascript based library that makes client side programming easy.
   jquery is javascript based library that makes client side programming easy.
   jquery is javascript based library that makes client side programming easy.</p>
   
   <a href="#top">back to top</a>
   
</body>
</html>

Sunday 14 April 2019

Local Drives Design Using Html


<html>
<head>
<title>Local Drives</title>
</head>
<body bgcolor=lightgreen>
<fieldset>
<center>
 <h1>Local Drives:</h1>
<label><b>Local Drive(C:)</b></label><br/>
<progress max='10' value='5'>
</progress> <br><br/>
<label><b >Local Drive(D:)</b></label><br/>
<progress max='10' value='8'>
</progress><br><br/>
<label><b >Local Drive(E:)</b></label><br/>
<progress max='10' value='3'>
</progress><br><br/>
<label><b >CD/DVD Drive(F:)</b></label><br/>
<progress max='10' value='1'>
</progress><br><br/>
</center>
</fieldset>
</body>
</html>

Friday 12 April 2019

Structure of Html Document


 Structure of Html Document:
 = = = = = = = = = = = = = = = 
-> Every Html document starts with <html> tag and end with </html> tag
-> the content that we prepared with in the  <html> </html> tags is divided into two sessions
     1) Head Session
     2) Body Session
  eg:
     <html>
     <head>
    <!---Head Session-->
    </head>
    <body>
   <!--Body Session-->
   </body>
  </html>

1.Head Session:
= = = = = = = = =
-> Content that is not directly display in the browser window is specified in head session.
-> Background supported content prepared in Head Session.

2.Body Session:
= = = = = = = = 
-> content that is actually display in browser window is prepared in body session.
->except the head session tags remaining all tags can be include in body.
eg:
     <h1>,<p>,<a>,<table> tags etc..

Head Section in Html Document:
= = = = = = = = = = = = = = = = =
 -> head secton may includes any of the following tags:
      1) titles
      2)styles
      3)script
      4)link
      5)meta

1.Titles:
= = = = =
 -> titke tag i sused to display a title in browser title bar.
    usage:  <title>Login Page</title>

2.Styles:
= = = = =
-> style tag is used define the styles taht are used with in the document.
    usage:
              <style>
              h1
             {
                color:Blue;
             }
           </style>
3.Script:
= = = = =
->script tag is used define the client side programming in the document.
        usage:
                 <script>
                       alert("welcome");
                 </script>
4.Links:
= = = = =
-> link tag is used to link external .css files
-> it is also used to display images in title bar
usage:
          <link rel="stylesheet"  href="mystyle.css"/>
         <link rel="shortcut ion href="logo.icon"/>
5.Meta:
= = = = = 
-> meta tag is used to provide meta data about the document the document.
    eg: keywords ,discription,authors
usage:
         <meta name="keywords" content="java,php,jQuery,.net,Anjular Js"/> 

eg: <!--example for head section tags -->
<html>
<head>
<title> welcome page</title>
<script>
 //javascript code
 alert("welcome to HTML");
</script>
<style>
h1
{
color:blue
}
</style>
<meta name="author" content="narasimha"/>
<meta name='keywords" content=".net,java,php,JQuery,Anjular Js"/>
<link rel="shortcut icon"  href="sathya.ico"/>
</head>
<body>
<h1>WELCOME TO HTML</h1>
</body>
 </html>

Body Section Tags:
 = = = = = == = = = =
-> body tag can have number of tags these tags we divided into mutliple groups.
-> in this chapter we are developing web apges using  Basic Structure tags.

1.Heading Tags:
 = = = = = = = = 
-> heading tags are used to prepare the heading for different levels.
-> Html supports six levels of heading tags 
    <h1> to <h6>
Usage:
            <h1> heading 1</h1>
           <h2> heading 2</h2>
2.paragraphs:
 = = = = = = =
-> paragraph are preapared in html using <p> tag
 usage: 
            <p>this text paragraph</p>
3.Span:
= = = 
-> span tag is used to display simple/short message
  eg: <span>message</span>

4.img tag:
 = = = = =
-> image tag is used to display the image an the web page.
 usage:
           <img src="image.jpg"/>
-> image tag support following attributes to Customize the apperance of the image.
eg:
     <img src="images/image1.jpg" height=  "200" width="300" border="2"/>

5.Div Tag:
= = = = = = 
-> div tag is used to divide the content into multiple parts /sections.
-> we can groping multiple tags and apply the style div tag.
usage:
           <div>
            <!--required content-->
           </div>
eg:
<!--create a web page to demonstrate usage heading and paragraph tags-->
<html>
<head>
<title>welcome page</title>
<style>
p
{
  text-align:justify;
  border:2px solid blue;
 padding:10px;
}
</style>
</head>
<body>
<h1>Welcome to Html</h1>
<hr>
</body>
</html>